There are three certainties in life: death, taxes and accidently losing photos. No one is immune from having these precious memories lost to a digital abyss, never to be recovered. Over the years I have accidently deleted months' worth of images, accidently formatted a memory card before offloading images and had parents contact me regarding pictures I took of their athlete that they lost when their hard drive crashed. Based on these personal experiences and hearing countless stories I have developed a workflow that I believe is both robust and efficient. While my workflow may be too complex or not fit your specific needs, I hope that some of these tips can help ensure that your photos aren't lost.
Camera/Memory Cards/Hard Drives
The first tip can be a little tough because it is dependent on your camera. I prefer to use cameras with dual memory card slots that allow for both cards to be written to at the same time, essentially creating a backup from the moment the image is captured. The full-frame Sony cameras I use have dual card slots and I have them set up to record both RAW and JPEG images to both cards simultaneously.
I also have all of my memory cards numbered, so should I have an issue with one card I can easily identify and remove that card from my rotation. If I am photographing multiple events before I am able to offload the pictures to my PC, I may swap to a new set of cards prior to the next event to reduce the risk of losing images from the first event should the cards in the camera get corrupted. Finally, I use high-quality memory cards, purchased from reputable sources. Stay away from great deals on eBay or buying used as this is setting yourself up for a memory card to fail. I use and recommend Prograde CF-Express Type-A cards.
Currently I have over 10 terabytes of images from over the years, and I have a fairly robust storage solution with a home-built server. Over the years I have used numerous hard-drives and sold-state drives from multiple brands and I have found that it is incredibly important to only use name-brand drives and if possible to purchase drives that are specifically designed for your purpose. For example, in my storage server I use Western Digital Red drives that are specifically designed for a Network Attached Storage (NAS).
Post-Game Workflow
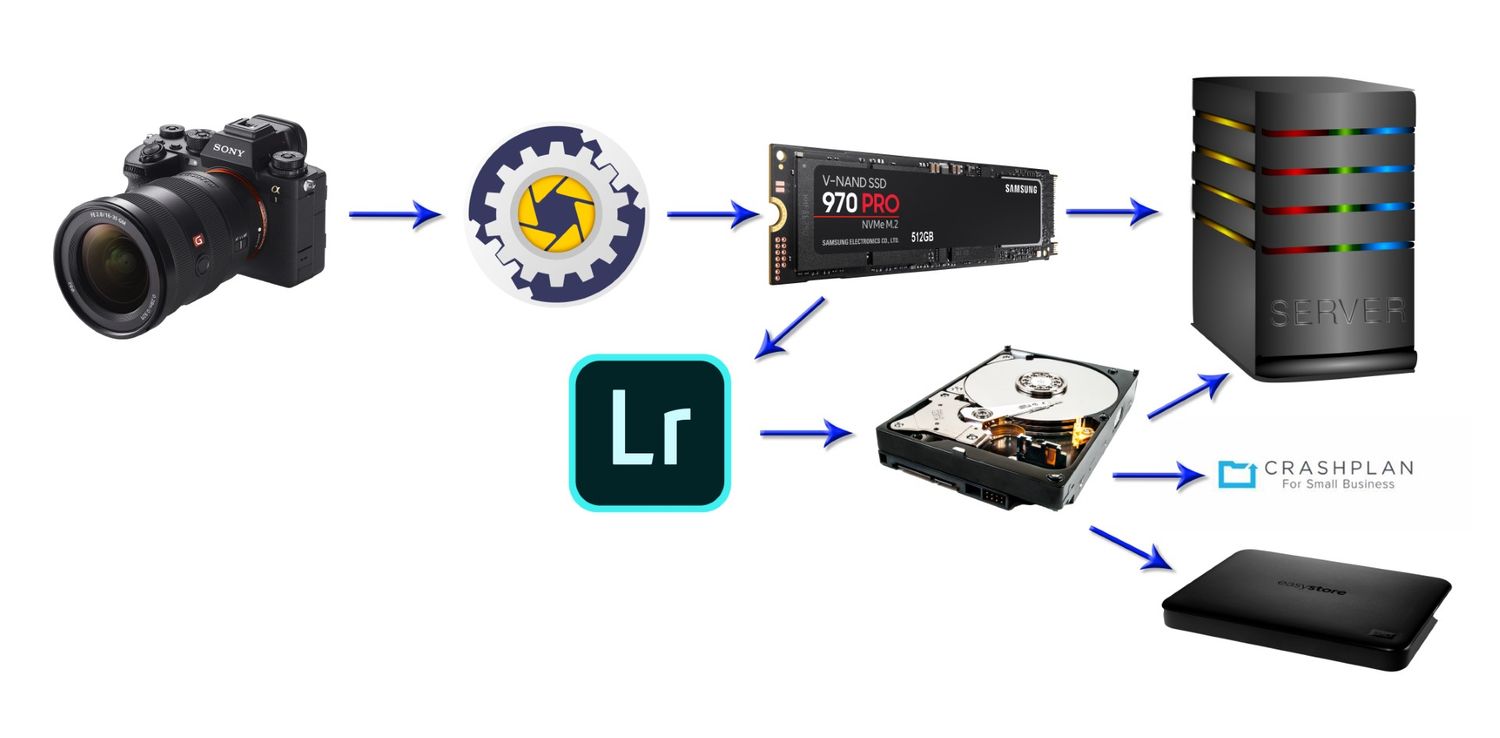
Below is my typical post-game workflow, which starts as soon as I get home. Even if the game was late and I am tired, I will try to at least ingest to my PC before I go to bed (steps 1-2).
- Using Photo Mechanic, images are ingested to a "Project Drive" on my main PC from CF-Express Cards and are renamed with "JGPHOTO_DATE_SEQUENCE" where the date format is YYYYMMDD and the sequence number simply starts with 001 for each shoot (Example: JGPHOTO_20251210_010). Photo Mechanic allows for simultaneous ingest from multiple cards and can be set up to efficiently rename all photos. The Project Drive on my PC is a stand-alone 2TB NVME SSD that is only used to store images or videos that I am currently editing.
- As images are being ingested to the "Project Drive" they are automatically backed up to my local storage server and retained for 30 days. I may have taken 2,000 images and will only keep 200, but I have all 2,000 backed up to my server for 30 days after the photo shoot. After 30 days the backed up files are automatically deleted. This is intended to be a short-term back-up should something happen to the Project Drive or if I am a little over-zealous during culling and delete photos that I shouldn't have (I have had athletes and parents reach out asking if there are any additional images beyond what I posted).
- I have a home-built server running a Linux distribution called UnRaid (though any NAS (Network Attached Storage) or external hard-drive will work for this purpose). Without getting too technical, UnRaid allows for redundancy through the use of parity drives, allowing for failed drives to be replaced without data loss. I recommend that any local backup solution, whether a NAS or server have some sort of redundancy built in. My UnRaid server has dual parity drives, allowing for 2 hard drives to fail simultaneously without any data loss.
- In Photo Mechanic, images are reviewed and tagged for editing (using the "t" key). I can cull through ~2,000 images in about 15 minutes and will typically tag around 10% of the images to be edited. All un-tagged images are deleted from the Project Drive (though backup remains on server for 30 days from step 2). Tagged images from Photo Mechanic are then ingested into Lightroom to begin the editing process.
- Once in lightroom I will denoise images using DXO Pure Raw as needed. This can be an intensive task, and on my high-end PC can take approximately 30-45 minutes to complete 200 images. This is a process that I will try to overnight, so that I can start the final editing first thing in the morning.
- In Lightroom all images are cropped, edited and tagged with a single star once completed. In addition, I tag any images that I want to use for Instagram with 2 stars (I will try and find 5 images for each team). For most events, I will either use a custom preset that I had previously created, or I may create a new preset which will be applied to all images from that game. I have found that applying the preset and crop aspect-ratio in the Library module of Lightroom is the most efficient way to quickly get started with editing.
- Keywords are applied for Sport, Level, Gender and School. I will also Keyword any images of Coaches, Officials, Fans or Details so that I can easily find these images in the future. Whether I am contacted by a parent looking for an image of their athlete, or I am looking for inspiration from past photographs I have taken, keywords make finding a specific needle in a pile of thousands of needles much easier.
- All images with 1 or more stars are exported for upload to MaxPreps and/or my website.
- Images with 2 starts are exported from Lightroom with my watermark for upload to Instagram, Facebook and X.
- Full-size TIFFs are exported to my local hard-drive and re-loaded to Lightroom
- These full-size TIFFs are backed up to my local server and CrashPlan (cloud back-up service)
- All original, tagged RAW images are moved to my local server to an archive folder.
- Monthly all original RAW images are copied to external hard drives that are stored off-site.
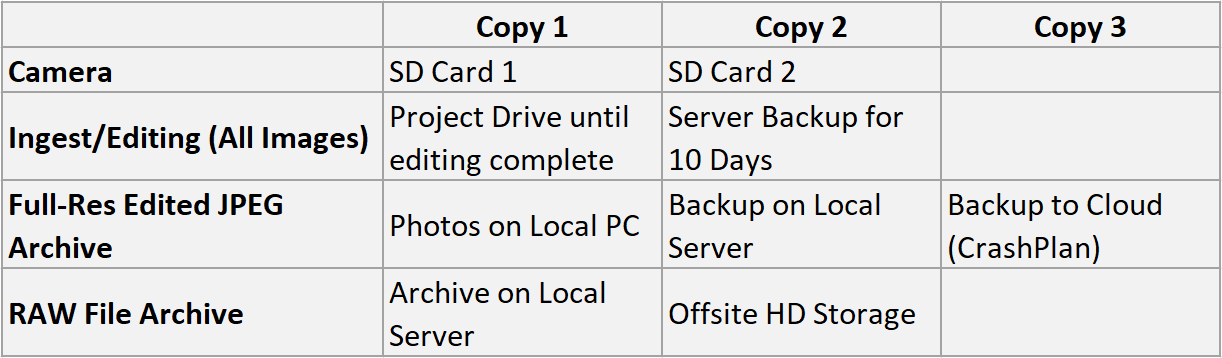
All of this allows me to maintain a minimum of 2 copies at any time in the process, 3 copies of the final edited TIFF files (local PC, local server and cloud), 2 copies of the original RAW files (local server and offsite HD) in addition to the images that are on MaxPreps. This entire process works somewhat seamlessly from photoshoot to delivery of images and allows for peace of mind that the images I produce will be available in the future.
Below is a chart that shows were the images are stored throughout the entire workflow process: